Project 1: What's the frequency, Kenneth?
Due by: Friday, September 12, 2025 at 11:59 p.m.
Introduction
A secret message has been sent to you by ... well, you don't know, it's a secret! It could be an admirer or a terrorist or a disgruntled professor. The trouble is that you don't have a key to decrypt it with. You suspect that it's a Vigenère cipher of an English message. Thus, you can write a cryptanalysis tool using frequency analysis and the index of coincidence.
Overview
Your job is to write two programs. The first can encrypt and decrypt text using the Vigenère cipher. The second is a program that can fully automate the cryptanalysis of the Vigenère cipher, recovering the key phrase and decrypting the message. In the Vigenère cipher, a message is added to a key phrase, modulo 26. Since the key phrase is usually not as long as the message, the key phrase is repeated over and over as needed.
Encryption and Decryption
Your encrypting and decrypting program should have its main() method in a class called Vigenere. Its operation is straightforward. It will prompt the user to ask if encryption or decryption is desired. Then, it will prompt for an input file, a key phrase, and an output file. Below is an example of the output of the program. (User input is shown in green.)
Encrypt or decrypt a file (e/d): e
Please enter file to encrypt: proposal.txt
Enter key phrase (no spaces): TOXICITY
Enter output file: proposal.cipher
Note that the input file may contain any characters, but you should ignore anything but the 26 letters of the alphabet. You should read the file line by line, preserving the new lines in the source document but no other non-letter characters. When reading in characters, you should convert them to their uppercase versions. Likewise, you can assume that the key phrase has no non-letter characters in it, but you should convert it to uppercase. The output file (for either encryption or decryption) should contain only uppercase letters and newline characters.
Here are sample files matching the interaction above. The file proposal.txt is a plain-text version of A Modest Proposal by Jonathan Swift, downloaded from Project Gutenberg. The file proposal.cipher is its encryption using the key phrase TOXICITY. The file proposal.plain is the decrypted version, which, of course, is all uppercase with no punctuation. Your output should match exactly.
Cryptanalysis
Your cryptanalysis program should have its main() method in a class called Attack. There are three important stages to the cryptanalysis program. The first is user input, the second is determining the length of the key used in the cipher, the third is finding the values of each letter in the key and decrypting the ciphertext file.
User Input
The user input is very simple. The program only needs to know what file to cryptanalyze. Here is an example of an interaction with the program in which the user decides to analyze the proposal.cipher file created earlier. As before, user input is shown in green.
Please enter file to analyze: proposal.cipher
Determining Key Length
The most difficult part of cracking a Vigenère cipher is determining the key length. A standard technique is exploiting the index of coincidence, which is a measurement of correlation. Finding the index of coincidence tells you something about the unevenness of the distribution of frequencies of letters. As it turns out, human languages have characteristic values for their unevenness. A language in which all letters appear with equal frequency would have a normalized index of coincidence of 1.0. English has around 1.73.
The normalized index of coincidence for a passage of text is given by the following formula.
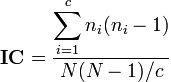
So, you must count the number of occurrences of each letter, multiply this value by itself subtracted by 1, and sum up these products for all 26 letters. Finally, you should divide the resulting quantity by the total number of letters in the document multiplied by itself subtracted by 1. Finally multiply the result by c, the number of letters in the alphabet, which in English is 26.
Except that would be too easy. If this value is close to 1.73, the Vigenère key probably only has a single letter in it, making it a shift cipher. What we want to do is see what will happen if we consider various lengths. For each length, characters that are offset from each other by a multiple of the length will be shifted by the same amount. Thus, just those letters taken together should have an index of coincidence close to 1.73. So, for a length of 2, we would find the index of coincidence of the even letters and the index of coincidence of the odd letters separately. Then, we would average those two values together to get the delta bar index of coincidence. To find the delta bar index of coincidence for a key of length 3, you should separately find the index of coincidence for those letters whose position in the text is 0 mod 3, those letters whose position is 1 mod 3, and those letters whose position is 2 mod 3. Then average these together. Continue this process, up to a length of 15. (Thus, our cryptanalysis program will only work for Vigenère keys with lengths between 1 and 15. Nevertheless, the use of a named constant should make it possible to change the program to attack larger keys without difficulty.)
The resulting delta bar indices of coincidence should be printed out, rounded to 2 decimal places for ease of reading. The value that is closest to 1.73 should correspond to the length of the key. Here is the output that corresponds to the cryptanalysis of proposal.cipher. The value 1.69 at length 8 is closest to 1.73, which should come as no surprise since "TOXICITY" has 8 letters. Note that it is possible for an index of coincidence to be larger than 1.73. You are not looking for the largest index; you are looking for the one closest to 1.73, whether larger or smaller.
Length: 1	IC: 1.14
Length: 2	IC: 1.26
Length: 3	IC: 1.14
Length: 4	IC: 1.35
Length: 5	IC: 1.14
Length: 6	IC: 1.26
Length: 7	IC: 1.14
Length: 8	IC: 1.69
Length: 9	IC: 1.14
Length: 10	IC: 1.26
Length: 11	IC: 1.14
Length: 12	IC: 1.35
Length: 13	IC: 1.14
Length: 14	IC: 1.26
Length: 15	IC: 1.13
Finding Key Letters
Once the length is known, it's not difficult to find the letters of the key. If, for example, the length of the key is 5, every fifth letter will be shifted by the same amount. For that set of letters, we can try to shift it by all 26 possibilities (including 0) to see which shift will give us a frequency distribution that matches English letters.
To measure which shift gives the frequency distribution closest to English, use the following table of frequency values.
| Letter | Frequency | Letter | Frequency |
|---|---|---|---|
| A | 0.08167 | N | 0.06749 |
| B | 0.01492 | O | 0.07507 |
| C | 0.02782 | P | 0.01929 |
| D | 0.04253 | Q | 0.00095 |
| E | 0.12702 | R | 0.05987 |
| F | 0.02228 | S | 0.06327 |
| G | 0.02015 | T | 0.09056 |
| H | 0.06094 | U | 0.02758 |
| I | 0.06966 | V | 0.00978 |
| J | 0.00153 | W | 0.0236 |
| K | 0.00772 | X | 0.0015 |
| L | 0.04025 | Y | 0.01974 |
| M | 0.02406 | Z | 0.00074 |
To measure how good each of the 26 possible shifts are, we want to do Pearson's chi-squared test. To do so, subtract the expected frequency of each letter from the actual frequency of that letter, square each of these differences, divide by the expected frequency, and then sum up these results. Below is a mathematical description of this value. In this formula, the numbers 1 through n correspond to the 26 letters (probably numbered 0 through 25 in your implementation), making Oi the observed frequency of a letter after decryption and Ei the expected frequency.
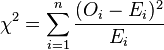
The sum of these values is an estimate of the error. Whichever shift has the lowest error should be chosen as the key letter for that partition of the characters.
After all the letters have been determined, output the key, decrypt the document, and save the decrypted version to a file with the same name as the encrypted version with .cracked appended to it. For the example of proposal.cipher, the output file would be proposal.cipher.cracked. Because the key was completely broken, this file is identical to proposal.plain. The appropriate console output follows.
Recovered key:	TOXICITY
Decrypted content written to proposal.cipher.cracked
Hints
- Start early.
- The idea of dividing a document into partitions and then testing the index of coincidence and the letter frequencies for each partition is not difficult. However, the data structures needed to keep track of all of the different counts can quickly become hard to manage. Make sure you have a good plan of attack.
- This is an applied class, not a programming class. The entire Java Collections Framework and standard library are available for your use. If you have concerns about whether or not you are allowed to use a particular class, feel free to ask.
- Since you need to decrypt a file in the
Attackclass, it makes sense to call the decryption method you wrote in theVigenereclass. Don't duplicate effort. - Think before you code. 1 minute of design == 10 minutes of coding == 100 minutes of debugging.
Submit
Zip up all the .java files you use to solve this problem from your src directory, including Vigenere.java and Attack.java, and upload this zip file to Brightspace. Zip up only the source files, not the entire project. All work must be submitted by Friday, September 12, 2025 at 11:59 p.m. unless you are going to use a grace day.
All work must be done within assigned teams. You may discuss general concepts with your classmates, but it is never acceptable for you to look at another teams' code. Please refer to the course policies if you have any questions about academic integrity. If you have trouble with the assignment, I am always available for assistance.
Grading
Your grade will be determined by the following categories:
| Category | Weight |
|---|---|
| Regular encryption | 15% |
| Regular decryption | 15% |
| IC calculations | 30% |
| Key determination | 20% |
| Output formatting | 10% |
| Style and comments | 10% |
Code that does not compile will automatically score zero points.