Project 4: Wave Goodbye
Due by: Monday, March 23, 2026 at 11:59 p.m.
I am sitting in a room different from the one you are in now. I am recording the sound of my speaking voice, and I am going to play it back into the room again and again until the resonant frequencies of the room reinforce themselves so that any semblance of my speech, with perhaps the exception of rhythm, is destroyed. What you will hear, then, are the natural resonant frequencies of the room articulated by speech. I regard this activity not so much as a demonstration of a physical fact, but more as a way to smooth out any irregularities my speech might have.
For this project you will write a program that processes audio files based on user input. You might be familiar with audio editing tools such as SoundForge or Cool Edit Pro. The program you will write will have some of the same functionality, only using text input commands instead of a GUI.
Background
This project is based around the manipulation of audio data inside a program. As you probably known from physics classes, sound travels as a wave. We can visualize this wave as something like a sine function.
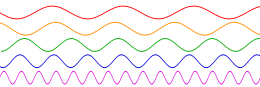
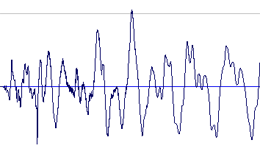
Here is an image of several waves with different frequencies. Each is what is called a pure tone. At the top, the frequency is lower, making the equivalent note lower in pitch. The pitch of the notes increases as the waves go down the page. Of course, the representation of real sounds are more complex. Real sounds have chaotic looking wave forms because much more is going on than just a single pure tone, as shown below.
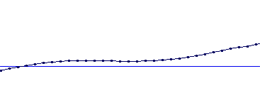
Of course, computers can't deal with with nice, smooth waves. To record or manipulate a sound in a computer, you need to turn the wave into a series of values. This is done with a process called sampling. Sampling means that the wave is chopped up into lots of equal sized time divisions. For each division, we pick one value to represent the wave at that point. In this way, we can approximate the wave with a series of numbers. Below is a picture showing a tiny section of a wave form. Each small blue box represents the sample value of that wave.
With CD quality sound, there are 44,100 samples per second. That's why CD audio takes up so much space. Every single second has 44,100 numbers giving the height of various parts of a wave. This project is about manipulating WAVE files but not MP3s. MP3s use a number of mathematical and psycho-acoustic techniques to use a lot fewer numbers to represent the waves. So, we're going to stick with CD quality audio, stored in the form of .wav files on your computer.
Overview
In this project, you will use your knowledge of loops, arrays, structs, and dynamic memory allocation to make a program that takes an audio file as input and then applies a number of audio processing tasks and effects to the file. Each task is indicated by a command line argument such as -r or -s. Some commands require additional information to be read as subsequent command line arguments. All of these commands are given as input typed by the user. There is no limit to the number of commands that can be provided, and they should be processed in order.
There are 7 commands in total. The corresponding tasks are:
| Task | Command | Description |
|---|---|---|
| Reverse | -r | Reverse the audio |
| Change speed | -s | Change audio speed by a specific factor |
| Flip channels | -f | Flip the left and the right stereo channels |
| Fade out | -o | Fade out from full volume to zero at the end of the file over a specified time |
| Fade in | -i | Fade in from zero to full volume at the beginning of the file over a specified time |
| Volume | -v | Scale the volume of the file by a specified amount |
| Echo | -e | Add an echo to the sound with a specified delay and a specific scale factor |
Input and Output
Command Line Arguments
The commands for processing the audio will be read in from command line arguments. These will be -r, -s, -f, -o, -i, -v, -e, or the string equivalent of a double indicating some additional parameter needed for a command. You may use the atof() function to convert these string representations into double values. The user can provide any number of commands (including no commands, indicating that the sound should be sent to stdout with no changes).
Use of the program will look similar to the following command. It takes the file crosstown.wav as input, reverses it, flips its left and right channels, scales the volume to 75%, fades out its end over 1 second, and adds an echo with a delay of .1 seconds and a scale factor of .25. Finally, it sends the modified file to stdout where it is redirected into the file output.wav.
./wave -r -f -v .75 -o 1 -e .1 .25 < crosstown.wav > output.wav
You should be able to use the Movie Player to listen to sounds in Ubuntu with headphones.
Reading the WAVE Data
Reading WAVE files themselves is trickier than processing the command line arguments. I advise you to read this page, which has a thorough description of how a WAVE file is stored. The most difficult part is taken care of for you. Files provided below (wave.h and wave.c) contain functions that can read and write the header of a WAVE file.
The WAVE file standard is part of the more complex RIFF file standard which is based on chunks of data. The first chunk is the RIFF chunk which has very little useful information other than file size information. The second chunk is the format chunk which gives information about the compression, the number of channels, the sample rate, the byte rate, and the bits per sample. The data chunk has information about the size of the data and the audio data itself. Once you call readHeader(), the file input pointer will have been moved to where the audio data is. You will need to allocate space for the left and right audio channels based on the number of samples which you will compute from the header information. Your program should work for uncompressed 16-bit stereo WAVE files sampled at 44,100 Hz. Any other files should cause the program to quit with an error.
Because the files will user 16-bit samples, you will need arrays of short values to hold the audio data. I encourage you to make separate left and right channel arrays, separating the data out into these arrays when you read the file and merging them back together when you write the file. Performing sound processing on the channels when they are mixed together in one array is maddening.
The data alternates between left and right samples until the end of the file. The only input you are allowed to do is with getchar(). Consequently, you will have to read in two char values and combine them into a short. Remember that these are binary values, not regular printable characters.
Printing Auxiliary Information
You might want to print additional information to the screen to help you with debugging your code or giving extra information to the user, including error messages. Unfortunately, printing to the screen using printf() will send the information to stdout, which would be redirected to the WAVE file you are outputing.
Unix developers devised a solution to this problem long ago, since they also needed to redirect output to a file while getting useful information about the process. In addition to stdout, there is a stderr stream that prints to the screen even when stdout has been redirected to a file. It is possible to redirect stderr separately (into a log or error file), but we will not discuss that here.
Printing to stderr is easy, but you cannot use printf(). Instead, use the fprintf() function which prints to a file. Its first argument is the file it is printing to. It's other arguments work exactly like printf() arguments.
int errorCode = 7;
printf("This is data being sent to stdout.");  //prints to the screen (might be redirected)
fprintf(stderr, "Error! Code: %d", errorCode); //prints to screen even if stdout is redirected
In my sample implementation, I use stderr to print out the header information of the WAVE file I read in as well as the header information of the WAVE file I output. You are not required to do so, but that information and other data is useful and can be sent to the screen by using stderr and fprintf().
Sound Processing
Reversing Sounds
To reverse a sound, take each array of short values representing samples and reverse the order of its elements. The new arrays will effectively contain the audio backwards.
Changing Speed
Allocate new short arrays whose lengths are length/factor, where length is the original length of the arrays and factor is the amount by which you are speeding up the audio. Then, loop through the new arrays filling them with values from the original arrays. Element i in the new arrays will correspond to element i*factor from the old arrays. That is, if factor is 2, you will use every other value from the originals. Obviously, the index in the old array that you calculate will be a double and will need to be cast to an int value. A sound will be sped up with a factor greater than 1 and slowed down with a factor less than 1. Values much outside the range [.5, 2] are likely to give unlistenable results.
Be sure to free the old memory allocated for the sound after the speed change. Also, make sure you update the header so that it contains the correct size information. Both the size and the dataChunk.size values should be updated.
Flipping Channels
This program is designed to edit only stereo files. These files have a different channel for the left ear and the right ear, adding a degree of realism. To flip the left and right channel, simply swap the pointer which points at the array of values for the left channel with the pointer that points at the array of values for the right channel. Note that this effect can be a subtle one. Most of the files contain spoken dialog whose left and right channels are identical. Try flipping the channels for the music in crosstown.wav and rain.wav for a more pronounced effect.
Fading Out Sounds
A common audio production technique is to fade out the volume of a track at the end. For this option, the user will specify a double representing the number of seconds during which the fading out process will happen. You can compute the equivalent number of samples by multiplying the sample rate (44,100) by this number of seconds and rounding down. Each sample in the range should be multiplied by a value that starts at 1.0 at the beginning of the range and gradually gets smaller until it reaches 0.0 at the end. Let there be n samples in the fade out range, numbered from 0 to n - 1. A linear multiplicative factor for sample i (where i falls between 0 and n - 1) would be 1.0 - i/n. Instead, use a quadratic factor, which is the linear factor squared. Note that these quadratic factors will still fall in the range from 1.0 to 0.0. Because our perception of sound is logarithmic, this quadratic decrease sounds more natural to our ears than a linear decrease. If the sound is shorter than the time specified, fade out the sound exactly the same as if it were longer (the beginning of the sound will already be in the middle of the fade out process).
Fading In Sounds
The other side of the coin of fading out is fading in the volume of a track from the beginning. For this option, the user will specify a double representing the number of seconds during which the fading in process will happen. You can compute the equivalent number of samples by multiplying the sample rate (44,100) by this number of seconds and rounding down. Each sample in the range should be multiplied by a value that starts at 0.0 at the beginning of the range and gradually gets larger until it reaches 1.0 at the end. Let there be n samples in the fade in range, numbered from 0 to n - 1. A linear multiplicative factor for sample i (where i falls between 0 and n - 1) would be i/n. For the same reasons given above, use a quadratic factor, which is the linear factor squared. If the sound is shorter than the time specified, fade in the sound exactly the same as if it were longer (the end of the sound will happen in the middle of the fade in process).
Changing the Volume of Sounds
Multiply each value in the arrays of audio samples by the scale supplied by the user. If the scale is larger than 1, the sound will get louder. If the scale is smaller than 1, the sound will get quieter. A value of 0 would make the sound completely inaudible. Make sure that scaled samples are clamped to the range [SHRT_MIN, SHRT_MAX] before they are stored back into the array. These constants are defined in limits.h, which you are free to include.
Adding an echo
This project specifies a relatively simple way to add an echo to a sound. The user will specify two double values on the command line after the -e option. The first of these will be the delay in seconds and the second will be the scaling factor.
To add the echo, you must first allocate new arrays to hold a sound which is longer by the delay. Multiply this value by the sampling rate (44,100) to find the number of additional samples you will need. Then, copy the original sound into the new arrays. Once you reach the point where the delay starts, you should add the values from the delay offset to the current location, scaled by the scaling factor given by the user. Usually, this value will be significantly less than one so that it sounds like an echo and not a louder version.
Be sure to free the old memory allocated for the sound before the echo. Also, make sure you update the header so that it contains the correct size information. Both the size and the dataChunk.size values should be updated.
Errors
Your program must recognize a number of error conditions. When it reaches one of these conditions, it should print an appropriate error message to the screen using stderr and exit.
You must support the following errors.
| Error | Cause | Message |
|---|---|---|
| Command line usage | Command other than the seven recognized commands was given | Usage: wave [[-r][-s factor][-f][-o delay][-i delay][-v scale][-e delay scale] < input > output |
| Insufficient memory | Call to malloc() failed (returned NULL) |
Program out of memory |
| File not RIFF | Header ID does not contain "RIFF" (must be another file format) |
File is not a RIFF file |
| Bad format chunk | Format chunk ID does not contain "fmt " or format size is not 16 or compression is not 1 |
Format chunk is corrupted |
| Bad data chunk | Data chunk ID does not contain "data" |
Data chunk is corrupted |
| Not stereo | File does not have two channels | File is not stereo |
| Invalid sample rate | Sample rate is not 44,100 | File does not use 44,100Hz sample rate |
| Invalid sample size | Samples are not 16 bits | File does not have 16-bit samples |
| Invalid file size | End of file reached before all the data was read | File size does not match size in header |
| Errors for Specific Commands | ||
| Invalid speed | Speed factor supplied is not a number or is not positive | A positive number must be supplied for the speed change |
| Invalid time | Fade in or fade out time is not a number or is not positive | A positive number must be supplied for the fade in and fade out time |
| Invalid volume | Volume scale supplied not a number or is not positive | A positive number must be supplied for the volume scale |
| Invalid echo | Echo delay or scale parameter is not a number or is not positive | Positive numbers must be supplied for the echo delay and scale parameters |
Provided Files
Here is a header file and a source file which gives information about the layout of the WAVE header and provides functions to read and write such a header.
Here is the sample executable whose functionality you should match. Feel free to rename it.
Here is a list of 24 sample sounds we have included for your use.
911.wavchance.wavcrazy.wavcrosstown.wavdead.wavdisorder.wavengarde.wavface.wavfigs.wavfreewill.wavgame.wavintermission.wavneural.wavoperational.wavpain.wavrain.wavrodent.wavshot.wavsledgehammer.wavteeth.wavthink.wavthundercats.wavtomorrow.wavtongue.wav
Turn In
Zip the contents of your project directory, including the makefile, the source C file(s), and header files. Upload this zip file to Brightspace. Do not include any object files or executables. Running the make command must compile all the required C source code files and generate an executable named wave. Running the executable wave with an input WAVE file redirected to stdin and command line options as explained above must output the correctly altered WAVE file to stdout (so that it can be redirected to a file).
All work must be submitted before Monday, March 23, 2026 at 11:59 p.m. unless you are going to use a grace day.
Grading
Your grade will be determined by the following categories.
| Category | Weight |
|---|---|
| Reversing sound | 10% |
| Changing the speed | 15% |
| Flipping channels | 5% |
| Fading out | 10% |
| Fading in | 10% |
| Change volume | 10% |
| Adding echo | 20% |
| Error handling | 10% |
| Correct makefile and file naming | 5% |
| Programming Style | 5% |
Under no circumstances should any member of one team look at the code written by another team. Tools will be used to detect code similarity automatically.
Code that does not compile will automatically score zero points.
