Lab 11: Binary Trees
Due by the end of class
Introduction
Efficient data structures are at the heart of the computer science world. Today we'll be looking at data structures called trees, specifically binary trees. If you've taken COMP 2100, you'll know them well. Otherwise, there is a short summary below.
Trees
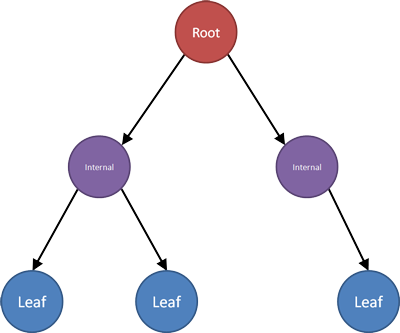
In computer science, trees are used to create a hierarchical representations of a set of data. A rooted tree has one root from which stem edges to other nodes. If a node has a child, then it is called an internal node. A node that has no children is called a leaf.

This example shows a binary tree because every internal node has no more than two children.
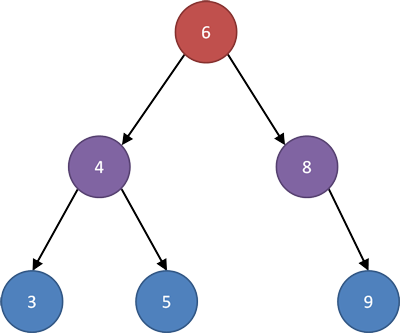
Because of the hierarchical nature of binary trees, they are perfect for keeping a set of data sorted. Consider the following example.

Note that everything to the left of the node containing 6 is smaller than 6 and everything to the right of it is larger than 6. Furthermore, the same definition applies recursively to all the children of that node. Everything to the left is smaller than its parent, and everything to the right is larger.
If you were looking for the value 5, you would take the following steps.
- Look at the root. It contains 6. Is 5 less than, more than, or equal to 6? Since it's less, go left.
- Now you're at the node containing 4. Is 5 less than, more than, or equal to 6? Since it's more, go right.
- Now you're at the node containing 5. Is 5 less than, more than, or equal to 5? It's equal, so you're done.
The entire process took 3 steps, much less than looking through an unsorted array with six elements. In general, finding an element will take around log2n steps, where n is the number of elements in the tree.
Lab Exercise
Lab 9 was a program for storing a contact list. We're going to reimplement Lab 9 to use a binary tree instead of a dynamic array. Call your executable trees.
Create a binary tree of Contact structs. The tree should be ordered by name. You can use strcmp() to perform the comparison needed for ordering. Here is the updated definition of the Contact struct.
typedef struct _Contact
{
	char*	name;	// Full name of contact
	char*	email;	// E-mail address of contact
	int	age;	// Age of contact

	struct _Contact* left;
	struct _Contact* right;
} Contact;
The left and right fields of the Contact struct are the edges (links) from
a node to its children.
You'll need to write functions for each of the following prototypes.
Contact* addContact(char* name, char* email, int age, Contact* root);
Add contact information to the correct location in the tree and return a pointer to the root node. Usestrdup()to allocate copies of thenameandemailstrings. It is easiest to write this function recursively. If thenameyou want to add comes earlier in the alphabet than the root (or is the same, in case of duplicates), recursively calladdContact()on the left child. Otherwise, recursively calladdContact()on the right child. Eventually, you'll reach aNULL, where you should add the new contact.Contact* findContact(char* name, Contact* root);
Find a node in your tree. Return a pointer to the node if successful orNULLon failure. This function is easiest to implement recursively. As withaddContact()look to the left for smaller values and to the right for bigger ones. If you reach aNULL, you failed to find the contact. If thenamefield matches, return the pointer to that contact.void printSortedContacts(Contact* root);
Prints all the contacts in your tree, sorted lexicographically (like a dictionary). This function is essentially an in-order traversal of the tree. As with all of these, it is easiest to implement recursively. Recursively print out the left subtree, then print the current contact, then recursively print out the right subtree.void cleanUp(Contact* root);
Deletes the tree, freeing everything you have allocated. Note that thenameandemailfields for each contact must be freed since they were also allocated bystrdup(). Again, do this recursively, callingcleanUp()on the left and right subtrees before callingfree()on the current contact.
Consult the header file lab11.h for more details. Copy the code below, including the menu(), readLine(), printContact() and main() functions into your .c file. Do not copy the code from lab11.h into this file. Since even the main() function is provided, you only need to add the four functions described above to get a fully functional program.
The output should be almost identical to the output in Lab 9, except that records should always be printed in lexicographic ordering.
#include "lab11.h"

int main()
{
	char name[NAME_LENGTH];
	char email[EMAIL_LENGTH];
	int age = 0;
	Contact* root = NULL;
	Contact* found = NULL;
	char choice = '\0';

	do
	{
		choice = menu();
		switch( choice )
		{
			case 'A':
				printf("\tEnter name: ");
				readLine(name);
				printf("\tEnter e-mail: ");
				readLine(email);
				printf("\tEnter age: ");
				scanf("%d", &age);
				root = addContact(name, email, age, root);
				break;
			case 'F':
				printf("\tEnter name: ");
				readLine(name);
				found = findContact( name, root );
				if( found == NULL )
					printf("\"%s\" not found\n", name);
				else
					printContact( found );
				break;
			case 'P':
				printSortedContacts( root );
				break;
		}
	} while( choice != 'Q' );

	cleanUp( root );
	root = NULL;

	return 0;
}

char menu()
{
	int choice;

	// Print menu
	printf("A - Add a contact\n");
	printf("F - Find and display a contact\n");
	printf("P - Print contact list\n");
	printf("Q - Quit\n");
	printf("Your choice: ");

	// Get input
	while( isspace(choice = getchar()) );
	while( getchar() != '\n');

	return toupper(choice);
}

void readLine(char buffer[])
{
	int value = 0;
	int index = 0;

	value = getchar();
	while( value != '\n' && value != EOF )
	{
		buffer[index++] = value;
		value = getchar();
	}

	buffer[index] = '\0';
}

void printContact(const Contact* contact)
{
	printf("\t%s ", contact->name);
	printf("<%s> ", contact->email);
	printf("is %d years old.\n", contact->age);
}
Turn In
Zip the contents of your lab directory, including the makefile and the source C file. Upload this zip file to Brightspace. Do not include any object files or executables. Running the make command must compile the required C source code file and generate an executable named trees.
All work must be done individually. Never look at someone else's code. Please refer to the course policies if you have any questions about academic integrity. If you have trouble with the assignment, I am always available for assistance.
