Download the Excel file Club.xls (browse to this web page, right-click on the file name and select "Save Target As..." -- Firefox says Save Link As). Save it in your home folder. You will import most database contents from this spreadsheet.
Launch Access 2007. You may have to go through Start -> All Programs -> Microsoft Office to find it.
Click the Blank Database icon to create a new database, then give it a name of your choice. By default it will be stored in Z:\My Documents. To change this, click the open folder icon and browse to the desired destination. Then click Create to create the empty database.
Click the External Data tab, so you can import data from the spreadsheet. The spreadsheet contains two worksheets, Members and Meetings. Each of these will be imported to form a database table You can only import one worksheet at a time, so you will need to perform this step twice.
- Click the Excel icon. This will launch the Import Spreadsheet Wizard.
- Browse to and select Club.xls
- Select the worksheet, Members.
- You'll notice that the first row contains column headings. We will use these as our field names.
- When you get to the Field Options box for the ID field, change the Indexed value to Yes (No Duplicates)
- The member's ID number is in the ID field. This will become the key for this table. For the Primary Key selection, click Choose my own primary key. and select the ID field.
- We will keep the worksheet name as the table name.
- Finish out the wizard and notice the Members table is now available, although not open.
- Open it if you wish. Note: All names are fictitious. First names are the top 20 from a list of the 100 most popular girls' names I found on the web. Last names were produced by a program on the web that gives you random lists of names.
Repeat the previous step, to import the Meetings worksheet. Like the previous, the first row contains column headings that we will keep as field names. But some other specifications are different! Read the following carefully: Accept the Field Options as given. The Meetings worksheet does not have suitable key data, so Let Access add primary key.. We will keep the worksheet name as the table name.
The All Tables listing on the left now has both tables and should look like this: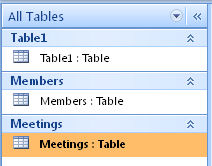
Delete the default Table1 table. You should be able to do this by clicking its tab then clicking the X to the right of its tab. If you do this and it also disappears from the All Tables list, you are done. If it remains in the All Tables list, right-click on it there and select Delete.
Import a third table called Attendance (this is the part that delayed me getting the project to you). I had hoped to give you easy instructions for creating and using a form to enter attendance information, but it became complicated. Instead, I have supplied attendance data in a separate spreadsheet which you will now import into a third table called Attendance.
- Download the Excel file Attendance.xls (browse to this web page, right-click on the file name and select "Save Target As..." -- Firefox says Save Link As). Save it in the same folder as the other spreadsheet and your database.
- Start the Import Spreadsheet Wizard, as described in Step 4 above.
- The speadsheet to import is Attendance.xls and there is only datasheet, Attendance.
- Use the default Field Option for Indexed: Yes (Duplicates OK) and change the Data Type to Long Integer as shown here:

- You must specify that there is no key as shown here:
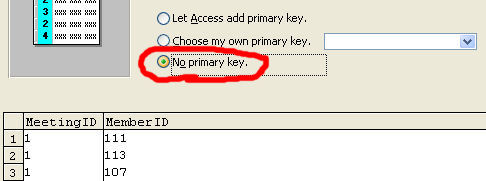
- Name the table Attendance (this should be the default).
Save what you've done so far. You should do this periodically anyway.
Establish relationships between the tables.
- Close all database tables.
- Click the Database Tools tab, then the Relationships icon
- Show all three tables using the Show Table dialog. With a little re-arrangement and resizing it will
look like this:

- Drag the ID field in the Meetings box over to the MeetingID field in the Attendance box. When
you release the mouse, a dialog like this will open.
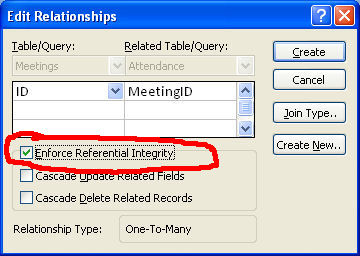
Be sure to check the Enforce Referential Integrity box before creating the relationship. - Similary, drag the ID field in the Members box over to the MemberID field in the Attendance box, and again check the referential integrity box in the dialog.
- At this point, you should be able to rearrange and resize the diagram so it resembles this:
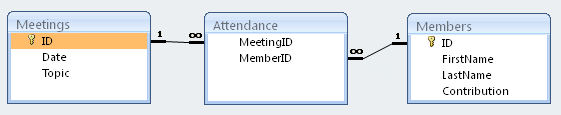
The relationship lines represent one-to-many relationships. The "many" is represented by the infinity symbol. Read them as "One Meetings ID can appear in many Attendance records and one Members ID can appear in many Attendance records."
Create a Query. Queries are questions that you ask the database. It provides the answers in the form of a new table. Our first question is:
Who attended the January 12, 2009 meeting?
Unfortunately, you have to ask the question in a language that Access understands! We will use Query Design to formulate the question.
- Select the Query Design icon from the Create tab.
- A new screen appears with the Show Table dialog in the middle. Add all three tables then close the dialog.
- After some rearranging, the center of the screen may look something like this:
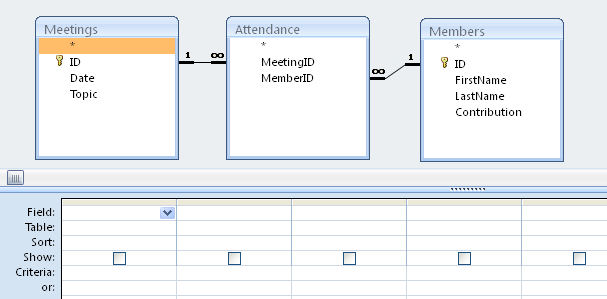
- Each column in the table below the relationship figure represents one field required for the query. For this query, we will be interested in three fields: (1) FirstName for display, (2) LastName for display, and (3) Date to select which meeting.
- Let's start with the name. Drag the FirstName field down into the Field row of the first column (alternatively, select Members.FirstName from the pulldown list).
- Similarly, drag LastName into the Field row of the second column. You'll notice in both cases, the Show box is checked. This is what we want because their names are to be displayed.
- Drag the Date field into the third column. Again, the Show box is checked but we don't care to display it so you need to uncheck it.
- We do however need to specify the selection criteria based on the date. We only want to select the January 12 meeting. We do this by entering the desired date into the Criteria row using the format: #1/12/2009# (the hash marks tell Access this is a date, not a strange attempt at division).
- Our query is now complete. This is a good time to save it! Select Save and give it a name (like "January 12 Meeting").
- Run the query, and the above screen should be replaced by a table. Based on the imported data, this table should contain a list of 11 names starting with Addison Gray.
Create a second query. This will be similar to the first one. This query will answer the question
Who attended the January 26, 2009 meeting? List attendees in order by last name.
Do and save this one on your own as "January 26 Meeting". It is nearly identical to the first query.
Create a third query. This one will answer the question
Which meetings did Madison Cox attend?
Try to do this on your own. You need one column for each field that is relevant to the question. Which field(s) should be displayed in the answer? You need a column for each. Which field(s) should be tested to meet the selection criteria? You need a column for each, and need to specify the Criteria for each. Save the query as "Cox meetings". The correct answer is she attended January 26, February 11, and March 1.
Create a fourth query. This one will answer the question
Who has made the largest financial contribution to the club?
Recommendation: List all members and their contributions such that the person with the largest contribution is listed first. Save the query as "big spender".