COMP 100 Projects
Winter 2010
Pete Sanderson
Project 2: Creating and publishing your own web page
Deadline: end of lab period, Tuesday February 2 -
credit reduced by 10% per day thereafter
20 points
Overview
In this assignment you will create your own web page using HTML-Kit software,
and publish it on the Otterbein web site. The major goal of the assignment is
for you to learn how to compose web pages and learn basic HTML.
Basic Requirements and Scoring
The 20 maximum points are based on the published page, and
are broken down as follows:
- Contains a picture of yourself that displays correctly (2 points)
- Contains at least four links and all links function correctly (4 points)
- At least one of the links must target the Otterbein home page http://www.otterbein.edu (1 point)
- At least one of the links must be an image that you can click on(2 points)
- Contains a background color or graphic (2 points)
- Contains other graphics, including at least one animated gif, that display correctly (2 points)
- Contains a table having at least 3 rows and 3 columns filled with text and/or images and/or links (4 points)
- The text is legible against the background and has no spelling errors (spell check is in Tools menu) (2 points)
- The web page is stored in a file called index.html (1 point)
You will get more details on each of these items in Phase 2 below.
Aside from the above requirements, you have freedom and control over the design and contents of your page.
Be creative! But also be aware it is a public page so anyone with access
to the Internet can view it. It will remain published for as long as you are at Otterbein, and you
can update it at any time.
Phase 1 : Gathering material to include on your web page
- First, create a new folder for this project.
Your web page will contain multiple files and they must all be
in the same folder! Open your home folder (double-click Home icon on lab computer desktop) and create a new folder for this project (right-click, then New, then Folder). Call your folder webpage.
- Second, find graphic images you would like to use in your web page.
These include: background graphics, divider lines, bullets,
animated graphic files, etc.
These graphics files typically use the GIF file format and have a filename that ends in ".gif". Find them using a Web search engine, such as Google.
Some keywords you can search for are "background gifs," "animated gifs," etc.
When you find an image that you like, you can copy it by clicking on it with the right mouse button and selecting
"Save Picture As..." from the menu that pops up.
If you right-click on the page background, it will say "Save Background As..." instead. The exact wording depends on what browser you are using.
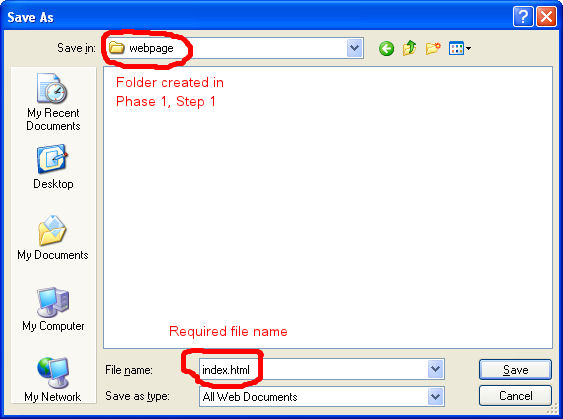
In response to this command you will be presented with a "Save As..." dialog box.
Save it in the webpage folder you created above.
Make sure to give the file an appropriate name and that you remember it for future reference.
IMPORTANT! Files that have spaces in the file
name, like "my picture.jpg" can cause problems! Before saving it, remove any spaces from the name!
Please consider that many graphics on the Web are copyrighted by their creators and should not be copied
and published on your web page. Such use may constitute an ethical violation of your Otterbein computer
use agreement.
- Third, research some sites to which you want to provide links.
These can be sites that represent interests, hobbies,
academic resources, entertainment, etc. To accomplish this you should do some
surfing, collecting a list of URLs you want to have links for. A good way of
collecting this list is to create a bookmark when you find
a page you like. With Internet Explorer, do this using the Add to Favorites... option in the Favorites menu.
With FireFox, use Bookmark this page from the Bookmarks menu.
- Fourth, select a photo of yourself for your web page.
Use an existing photo, or as a last resort your Otterbein photo is available on your Otternet page and can be saved. To find your Otternet photo:
log in to O-Zone, then scroll the Quick Links list to My Otternet and select it. When your Otternet page opens, click the
link for a class that you're taking. Look for your ID photo, right-click on it, select Save Picture As... and save it to your webpage folder.
Phase 2: Composing your page
Now that you've collected items to include on your web page, it is time to write it!
The software you will use to write your web page is HTML-Kit.
| OPTIONAL: HTML-Kit is pre-installed in the Towers 107B
lab. It is also freely available and you can download and install it on
your personal computer (Windows only). If you choose to do this, I recommend you download it from
download.cnet.com - enter html-kit in its search box at the
top of the screen and the first result should be "HTML-Kit Build 292". Click
its Download Now button. CNET is a well-established media company now owned by CBS. |
A. Starting HTML-Kit
- From the Start menu, select All Programs and look for HTML-Kit.
Moving your mouse there will activate a short submenu, from which you will select HTML-Kit, the first item.
- You may be presented with a series of YES/NO questions. If so, respond NO to all of them.
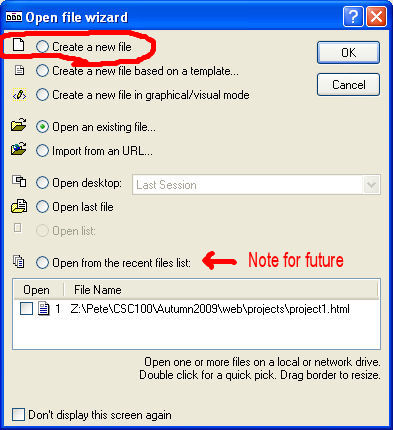
- When HTML-Kit starts up, you will see the Open file wizard dialog:
Select "Create a new File", then OK. Note for the future that you can
have it Open from a list of recently-edited files. Another option is to check the "Don't display this screen again" box
in the lower left corner.
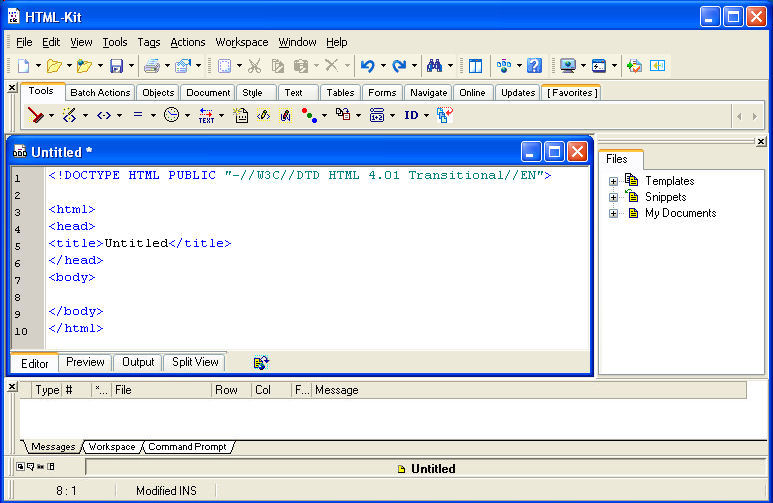
- After the previous step, your screen should look like this (assuming you are creating a new file).
B. Starting to write your page
- The First Thing To Do when your code work area looks like the figure above: Save your web page under the
name index.html. You must save it under this name! It must also be saved in the
same webpage folder with all the pictures and animations you want to use!
- The Second Thing To Do: replace the text "Untitled" inside
the <title> tag with the title of your web page. Something like "Welcome to John Public's
web page!"
- The Third Thing To Do: in the gap between <body>
and </body>, compose
the contents of your page. Save the page frequently (Ctrl+S is a shortcut, hold down
the Ctrl key and press the S key).
- You can preview the resulting web page at any time by clicking the Preview tab at the bottom of the editing window.
Click the Editor tab to get back. The preview screen is view-only.
- This is where you use your HTML skills. There is a quick guide to common HTML tags
below. In addition, Joe Barta has produced an excellent tutorial on HTML at
his PageTutor.com web site, accessible through the button here.

- I've also written a Quick Reference Guide to Popular HTML Tags, which includes an example HTML program with
the corresponding browser display.
C. Requirements and other Information
- Required Elements of your web page: Your web page can contain whatever content you want; use
your imagination and have fun with it! However, it must minimally include the following:
- A picture of yourself, using the <img src="filename"> tag
- At least four links (the <a>
tag), including a link to http://www.otterbein.edu.
IMPORTANT: the link name must start with "http://", example
<a href="http://www.mtv.com">MTV</a>. Otherwise
the link will not work!
- At least one image link. This is a link that displays an image instead of text. In the place where the
displayed text (MTV in the previous example) normally goes, put an <img> tag instead.
- A background color or graphic. The color, or file containing the graphic is specified as part of the pre-existing
<body> tag. Do NOT add a second <body> tag! See the Quick Reference
Guide for more details and an example.
- Other graphics, including at least one animated gif, using the <img src="filename"> tag.
Do not insert an image that is stored
in a different folder! Make sure that index.html and all your images are in the same folder!
- A table containing something. It can hold your links, some graphics, or
anything else you like such as your favorite songs or your course schedule.
It must have at least three rows and at least three columns.
- The browser will not automatically arrange items on your web page the way you want it to!
HTML was designed this way on purpose; the browser has final control over the display.
For instance, every image will be placed below the text or image that precedes it! The best
way to control the way things line up is to create an "invisible" table (see table tag in
the Quick Reference Guide and set border=0) and place
your items into its cells.
- One other thing to be aware of: Most HTML tags are like "bookends" that require two parts: the opening tag and
the closing tag. For instance to make a phrase bold requires a <b> at the start of
the phrase and a </b> at the end. There are a couple exceptions to this, such as <br> to add
a line break, and <hr> to add a horizontal line.
Phase 3 : Publishing
When you are finished, and ready to publish your web page, follow these steps.
There are other ways to do this, but here is a fairly easy one. This will copy the files from your
regular network folder (on Z:) to your Otterbein web server folder. This procedure assumes you are
at a computer in the Towers lab.
- On the desktop, double-click on "Home" icon. It looks like this:

- You are now in your regular home folder. Click the webpage folder to locate the files you need for your web page (they should all be in the
same place). Make sure that index.html and all the picture files are in the same folder.
- Select all the files you need (index.html and all the pictures).
Since they should all be in the same folder, you can do this using Select All
from the Edit menu. As an alternative, hold down the Ctrl key then click on
each file's icon. Each icon will darken as it is selected.
- Select Copy from the Edit menu. This will copy all the selected files into the system Clipboard.
- Back on the desktop, launch the Internet Explorer web browser.
- Into the web address box at the top, type ftp://students.otterbein.edu and click Go (or press the Enter key).
- You will be asked to enter your Otterbein login and password. Go ahead and enter those.
- The displayed web page should say something like:
FTP root at students.otterbein.edu
To view this FTP site in Windows Explorer,
click Page and then click Open FTP Site in Windows Explorer.
|
- You want to view the FTP side in Windows Explorer, so follow the directions; Page refers to
 (Internet Explorer 8 shows the icon but not the word 'Page').
- At this point, your home web folder is open. There should be no files there.
- Select Paste from the Edit menu. The files you copied into the clipboard in step 4 above should be
pasted into your home web folder.
Double-check that it worked! Go to your web browser and open web page
http://students.otterbein.edu/first.last, where first.last is your Otterbein login name.
Make sure that all images are displayed and all links work. If not, make corrections
in HTML-Kit and repeat the above procedure. If the browser says your page is
not found, then you didn't name it index.html. Correct this now.
Phase 4 : Let me know you're finished
When you have finished publishing and testing your web page,
send me an email message (psanderson@otterbein.edu)
and in the body of the message include a link to the URL (web address) of your
home page. No attachments please! I'll browse to your homepage
and grade it from there.
You are responsible for making sure everything on your web page works before writing to me. Credit will not be given
for images that do not display, links that do not work, etc.
| Working on this project away from the Towers lab |
|---|
|
HTML-Kit is available only in Towers 107B. You have two different options if you want to work on this project away
from the lab.
One, as described at the top, is to download and install HTML-Kit on your personal computer (Windows only).
A second option, available in other labs as well as on your personal computer,
is to use a simple text editor to compose your web page and your web browser
to preview it.
- The simplest Windows text editor is Notepad. From the Start
menu, select All Programs, then Accessories, then Notepad.
- To open your
web page (index.html) in Notepad, select Open from the File menu, then change
the Files of Type to All Files, then browse
to your index.html file and select it.
- To preview your web page
in Internet Explorer, start it up and select Open from the File menu then
click Browse and browse to your index.html. In Firefox, select
Open File from the File menu then browse to your index.html.
- Leave
both Notepad and the browser open. Each time you make a change in Notepad,
save your change then switch to the browser and click the refresh icon (the curved arrow).
Using a Mac? The TextEdit application included with OS X is a suitable equivalent to Notepad
when you go to the Format menu and choose "Make Plain Text".
(http://answers.yahoo.com/question/index?qid=20080420050939AAcJBLT)
|
[
Pete Sanderson
|
Math Sciences server
|
Math Sciences home page
|
Otterbein
]
Last updated:
Pete Sanderson (PSanderson@otterbein.edu)