C SC 100 Projects
Autumn 2002
Creating and Publishing your own Web Page
Gathering material to include on your web page
In this assignment you will be designing and creating your own web page.
This page will be published on the Otterbein website. The web page will
include the following elements:
- A picture of yourself
- At least four links - one of these must be to http://www.otterbein.edu/home
- A link with that will open an email window with your email address
in it
- A background color or graphic
- Other graphics, including at least one animated gif
- A table
You will get more details on how to build the page below. Today, I want
you to find samples of the following items that you would like to use in
your own page: background graphics, horizontal rules, bullets, animated
graphic files, etc.
These graphics files typically use the GIF file format and have a filename
extension of ".gif". Find them using a Web search engine, such as www.google.com.
Some keywords you can search for are "background gifs," "animated gifs,"
etc.
 When you find an image that
you like, you can copy it by clicking on it with the right mouse button and
selecting "Save Picture As..." from the menu pictured here. It will say
"Save Background As..." if you right click on the background. If you use
a browser other than Internet Explorer, the menu will look somewhat different.
When you find an image that
you like, you can copy it by clicking on it with the right mouse button and
selecting "Save Picture As..." from the menu pictured here. It will say
"Save Background As..." if you right click on the background. If you use
a browser other than Internet Explorer, the menu will look somewhat different.
In response to this command you will be presented with a "Save As..."
dialog box. It is best to create a new folder to contain all the files that
will go into your web page. Make sure that you give the file an appropriate
name and that you remember it for future reference.
Please consider that many graphics on the web are copyrighted by their
creators and should not be copied and published on your web page. Such use
may constitute an ethical violation of your Otterbein computer use agreement.
You will also want to research some sites that you are interested in providing
links to from your own page. These can be sites that represent interests,
hobbies, academic resources, entertainment, etc. To accomplish this you
should do some surfing, collecting a list of URLs you want to have links
for. A good way of collecting this list is to create a bookmark in Internet
Explorer when you find a page you like. Do this using the Add to Favorites…
option in Internet Explorer's Favorites menu.
The web page will also contain your photo. Your Otterbein photo should
be available on your OtterNet page (directions below). If you do not want
to use your Otterbein photo, you may use or scan another photo of yourself
using the scanner in the lab.
To find your Otterbein photo, do the following:
- Start up Internet Explorer (browse to www.otterbein.edu/home if not
already there)
- Select the Information Technology link
- Select the My Otternet Page link
- Select a profile
 icon next to any of your classes
Composing your page
Now that you've collected items to include on your web page, it is time
to write it! The software you will use to write your web page is Macromedia's
Dreamweaver.
Starting Dreamweaver: At the Start menu (lower left), hold down
the left button and move to the Programs
list. This opens up a new menu. Move to Macromedia, which opens up yet
a third short menu. Move the mouse toMacromedia Dreamweaver MX and let
up on the button to start the program.
Once Dreamweaver is started up, go to the View menu and select Code and Design. This will split
the main work area into two parts: the upper half will show your HTML code
and the lower half shows the page as it will be displayed by the browser.
Starting your page: The code window may show the HTML
outline of a web page (see the figure below), or it may be blank. If it
is blank, go to the File menu,
select New..., then click
the Create button.
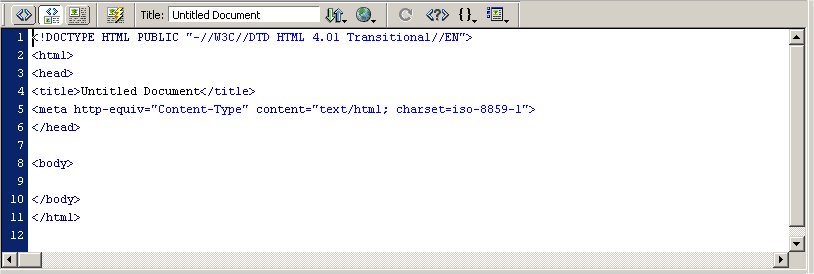
The First Thing To Do when your code work area look like the figure
above: Save your web page under the name index.html. You must save
it under this name! It must also be saved in the same folder with all
the pictures and animations you want to use!
The Second Thing To Do: replace the text "Untitled Document"
with the title of your web page. Something like "Welcome to John Public's
web page!"
The Third Thing To Do: in the gap between <body> and </body>, compose the contents
of your page. Every time you Save the page (use Ctrl-S as a shortcut,
hold down the Ctrl key and press the S key), the design area will be updated.
Type in some words and try it!
This is where you use your HTML skills. There is a quick guide to common
tags below. In addition, Joe Barta has produced an excellent tutorial
on HTML at his PageTutor.com web site. You can click on the PageTutor
button below and work through the tutorial. If you learn best by alternately
seeing examples and having opportunities to work exercises, then this
will be helpful.

Required Elements of your web page: Your web page can
contain whatever content you want; use your imagination and have fun with
it! However, it must minimally include the following:
- A picture of yourself
- At least four links (the <a>
tag), including a link to http://www.otterbein.edu/home
- A link that will open an email window with your email address in it
- A background color or graphic
- Other graphics, including at least one animated gif
- A table containing something. The table can hold your links, some
graphics, or anything else you like.
Finishing touches and publishing
When you are finished, and ready to publish your web page,
follow these steps. There are other ways to do this, but here is a fairly
easy one. This will copy the files from your regular network folder to your
Otterbein web server folder.
- On the desktop, double-click on "My Computer" icon.
- Double-click on the icon that has your name/ID on it. It also has
(Z:) at the end.
- You are now in your regular home folder. Locate the files you need
for your web page (they may be in subfolders). Make sure that index.html
and all the picture files are in the same folder.
- Select all the files you need (index.html and all the pictures). For
each file, hold down the Ctrl key then click on the file's icon. Each one
will turn dark.
- Select "Copy" from the Edit menu. This will copy all the selected
files into the system Clipboard.
- Back on the desktop, double-click on the "My Network Places" icon,
then "Entire Network" (the globe).
- Select the "Search for Computers" link.
- In the box labeled "Computer Name", type occardinal, then click the "Search
Now" button.
- A computer icon named
occardinal will appear.
Double-click on it.- Double-click on the folder named "Web", then on the
folder named "Home", then on the folder named "std".
- Double-click on the folder named after your MindLeaders I.D.
- This folder should be empty. It is your home folder for web pages.
- Select "Paste" from the "Edit" menu. This will copy all the files from
the clipboard.
To double-check that it worked, go to your web browser and open web page
http://students.otterbein.edu/
YOUR_MINDLEADER_ID/index.htmlSubstitute your MindLeader
I.D. for YOUR_MINDLEADER_ID.
It should look like what you saw in the Design area of Dreamweaver. If
not, perhaps you did not copy all the picture files.
When you have finished publishing your web page, send
me an email message which includes the URL (web address) of your home page.
No attachments please.
Quick reference guide to popular HTML tags
| Tag |
what it does |
| <p> |
Start a new paragraph. Leaves a blank line above the paragraph.
No closing tag needed, but you can optionally use </p> at the end of the paragraph. |
| <br> |
Forces a break to the start of the next line. There is no closing
tag. |
| <img src="filename">
|
Insert a picture. For filename, substitute the name of
the picture file. There is no closing tag. |
| <table> </table>
|
Defines a table. Within a table, you define each row using <tr> </tr> and within
each row you define each cell using <td> </td> . |
| <body bgcolor=color>
</body> |
Use the specified color for the web page background. For color,
substitute one of the 216 color codes, see http://www.visibone.com/colorlab/big.html.
Click the color you want and look for the large 6 hexidecimal digit code
to appear on the right. For color, substitute a hash mark (#) followed
by the 6 digit code. For example, #CC3366 is a medium
pink-red. Your web page can only have one<body> </body> pair! |
| <body background="filename">
</body> |
Use the specified picture file as the background for the web page.
For filename, substitute the name of the picture file. Your
web page can only have one<body>
</body> pair! |
| <i> </i>
|
Renders the enclosed text in italics |
| <b> </b>
|
Renders the enclosed text in bold |
| <center> </center>
|
Centers the enclosed text, pictures, and links. |
<a href="target_page">
</a> |
Defines a link. For target_page, substitute the address
of the web page you want the user to be taken to when the link is clicked.
In front of the closing tag, put the text (or image) that will be displayed
for the user. |
<a href="mailto:email_address">
</a> |
Defines an email link. For email_address, substitute the
email address of the person to whom mail is to be sent when the link is clicked.
In front of the closing tag, put the text (or image) that will be displayed
for the user. |
| <font size=value>
</font> |
Controls the font size of the enclosed text. For value,
substitute the size you want. You need to use small integers such as 3
or 4 or 5. You may also make it relatively larger by using +1, +2, etc,
or relatively smaller by using -1, -2, etc. Experiment with it. |
| <font color=value>
</font> |
Controls the color of the enclosed text. For value, substitute
the color value you want. See the description of colors in the entry for
<body>
Both size and color can be specified in the same font tag. |
| <ul> </ul>
|
Defines a bulletted list. Within a list, you define each item using
<li> </li>
|
| <ol> </ol>
|
Defines a numbered list. Within a list, you define each item using
<li> </li>
|
| <h1> </h1>
|
Renders the enclosed text as a very large heading! <h2> </h2> is smaller
than h1,<h3> </h3>
is smaller than h2, and so forth down to <h6> </h6> |
[Math Sciences server
|Math Sciences home page|Otterbein]